







Google Adsense

.
Showing posts with label Snail Adhesive. Show all posts

Thursday, June 30, 2011

Hello Card


This card was SO simple and so very quick to make! Recipe for this card is as follows:

-3 x 6 piece Pear Pizzaz cardstock-In Color Patterned Paper (from 6 x 6 Stampin Up In Color Patterned Paper book).
-1 1/2 x 3 1/2 piece card stock-Stampin Up Whisper White
-Hello Blossom Stamp-Stampin Up Summer Mini Album
-Ticket Corner Punch- Stampin Up
-Stampin Write Markers-Stampin Up (Island Indigo, Calypso Coral, Lucky Limeade, Pool Party, Wisteria Wonder-All are 2011-2013 In Colors and I also used Melon Mambo)
-Mistletoe Ribbon-Stampin Up
-Stick on Pearls-Michaels
-Snail Adhesive-Stampin Up

Use the markers to color the Hello Blossom Stamp. Before you stamp the image on the Whisper White, breath onto the marker to "re-activate" the color (if it still does not come up good enough on the paper, you can just use the writing tip of the marker to go over where its missing color). Use the Ticket Corner Punch on the ends of the whisper white card stock. Adhere it to the piece of Pear Pizazz patterned card stock. Place 4 pearls at the edges of the Whisper White card stock onto the Pear Pizazz paper. Cut a piece of Mistletoe ribbon and  using the snail, adhere all but an inch and a half on the left to the Pear Pizazz card stock. Cut off overlay on right side. On the left side, take another small piece of ribbon, and tie it unto the piece that you already started gluing (to make it look like a bow), then once you have done that, glue the rest of the 1st piece of ribbon down.

There you have it! If you are interested in purchasing any of these items, please do not hesitate to go onto my stampin up site: http://www.jessicarosewilson.stampinup.net/ and place an order!!

Monday, May 23, 2011

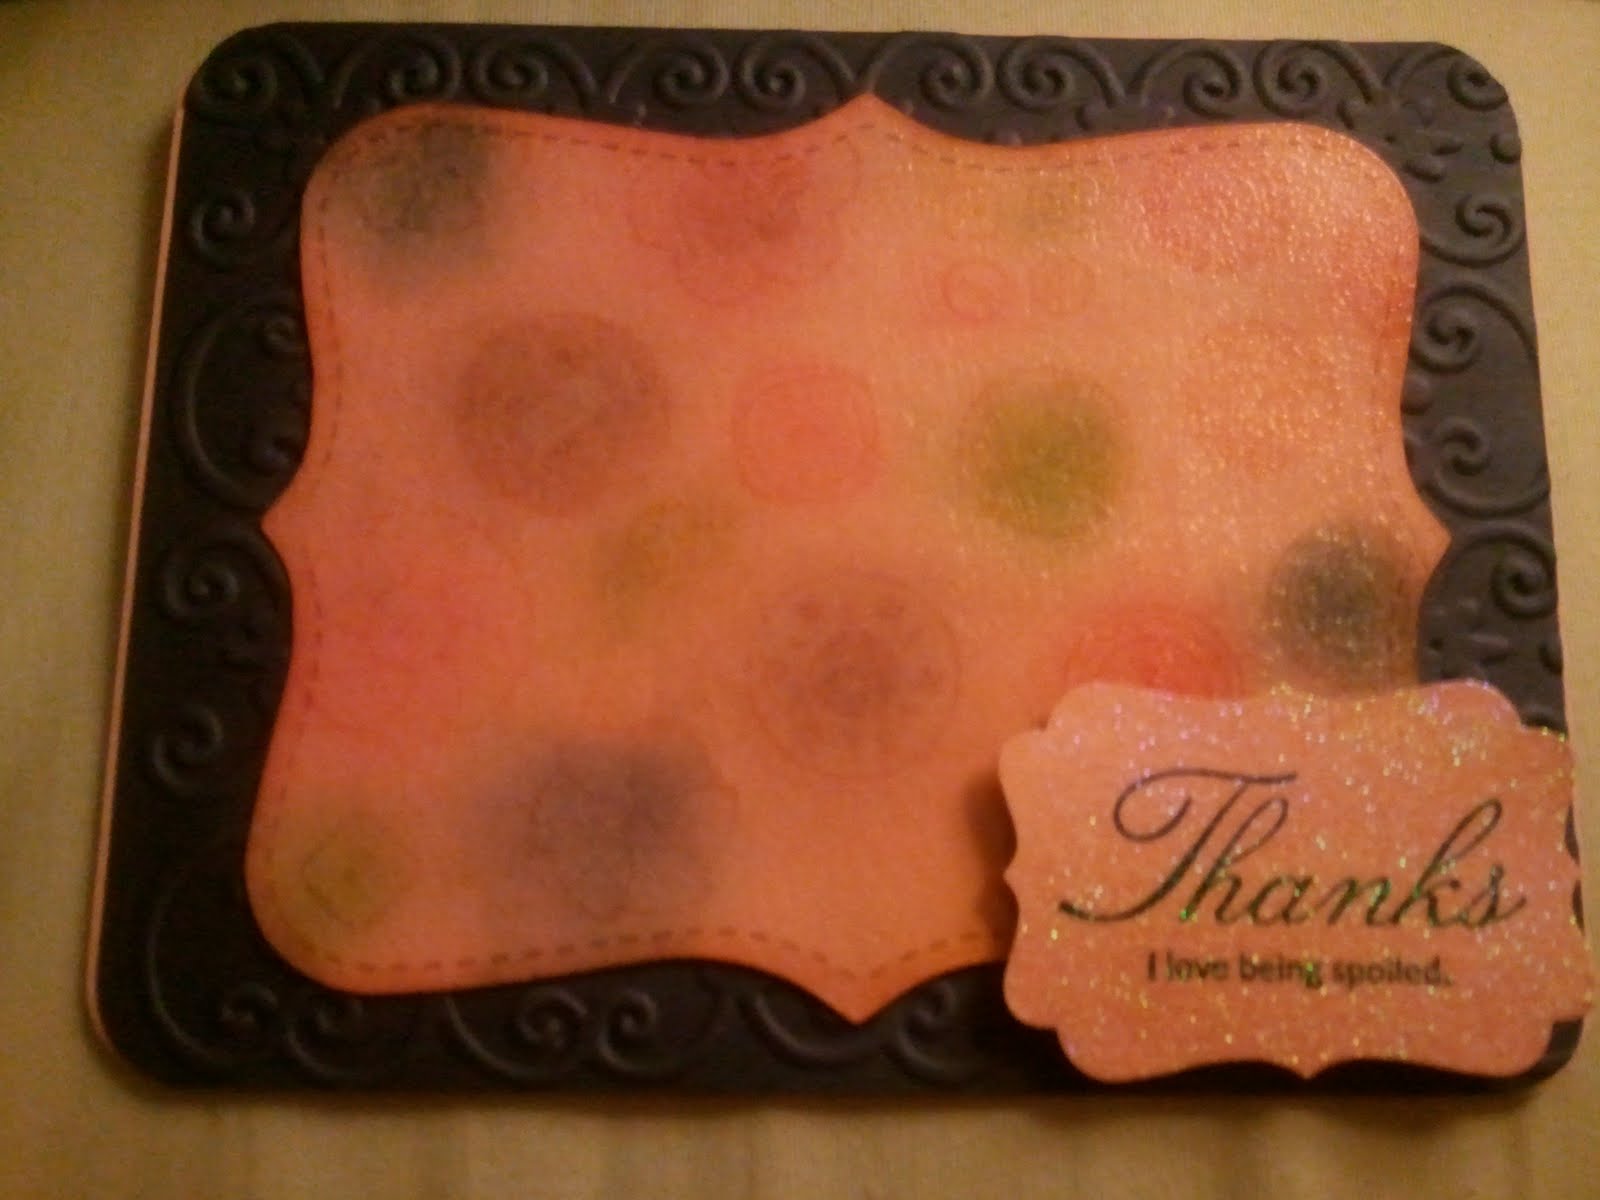
Another Thank You card


I have to say, this is by FAR one of the most fun cards I have made! I felt very "free" when making this card! I used:

Stampin' Up Button, Button Clear Mount Stamps (Used EVERY ONE on a very large clear block)
Stampin' Up Bigz Top Note Die
Stampin' Up Decorative Label Punch
Stampin' Up Afterthoughts Stamp-Thanks I love being spoiled
Stampin' Up Blushing Bride card stock (for die cut)
Stampin' Up Blushing Bride card stock for card base 5 X 4 1/2
Stampin' Up Concord Crush card stock (for layer) cut at 4 1/2 X 4
Sizzix Damask folder
Stampin' Up Stampin' Pastels (for coloring in the button stamps)
Stampin' Up Blushing Bride Stamp Pad
Stampin' Up Concord Crush Stamp Pad
Sponge
Stampin' Up Stampin' Dimensionals
Stampin' Up Snail Adhesive
Versa Mark Ink Pad
Clear Embossing Powder
Transparent Embossing Powder
Heat Tool
Powder tray

I made a top note from Blushing Bride from the Top Note Die on my Big Kick. While with the Big Kick, I placed my piece of Concord Crush in between the Damask folder and pressed it then I set it aside. I placed every button stamp from the Button, Button clear mount stamp set on a large clear block and just stamped the entire top note, and made sure I did not overlap them. I then took my sponge and sponged in Blushing Bride ink the edge of the entire top note. With the Stampin' Pastels, I took a few pieces of cotton balls and dabbed it in a few colors (you can be creative here, choose which ones you like). The best part of this was YOU CAN GO OUTSIDE THE LINES! YEA!! Afterward, take you Versamark Ink Pad and ink the ENTIRE top note cut out. Then, over your powder tray, take the clear embossing powder and cover the entire die. Take your heat tool and heat until the powder melts.

Taking another piece of Blushing Bride, stamp "Thanks, I love Being Spoiled" from  the Afterthoughts stamp set onto the paper. Next, take your decorative label punch and punch out your sentiment. Take your Versamark again and stamp the whole punched out shape. Place over the powder tray, and cover the punch with Transparent embossing powder. Take your heat tool until it melts.

Fold card in half and adhere the embossed piece on Concord Crush with your Snail to the card base. Then, after your top note has dried, adhere that piece with Snail in the middle to the Concord Crush piece. Take four Stampin' Dimensionals and put behind your sentiment piece that should also be cool. Place in the bottom right hand corner of your card.

All finished! All items can be purchased from my website:

http://www.jessicarosewilson.stampinup.net/

Happy Stampin'!