


Hello all!!!
I am finally on vacation and finally ready to settle down! I wanted to take a quick second to say MERRY CHRISTMAS to all of you!!! Hope you are all spending it with your loved ones!!! I will be waking up with 2 of my favorite guys (hubby and bubby)!
I am so excited to spend time with them and to see my munchkins face on Christmas morning!!!
Well, I'm beat!!! Time for bed for me!!!
Have a wonderful day with those that matter to you!!!
Hope to find you craftin' and Stampin'!
Jessica
Sunday, December 25, 2011
Thursday, December 22, 2011
GOD LORD! Where o where did my traditions go????
I have to say, this is the first year that I can HONESTLY remember that I did not enjoy the holiday season. I feel SO rushed this season, and I feel VERY behind. I'm not sure if its because I have had only 2 days off so far since December 1st, or that I feel like because I have no time, I have not been able to get my Christmas shopping finished, or because I still have not wrapped my presents yet, or because I am still trying to pack for our vacation that is quickly approaching. Whichever it is, I'm really upset about it.
While I was trying to do laundry tonight, I ran into the living room to grab a sock that has its partner MIA, and all of a sudden, I stopped dead in my tracks. My tree caught me so off guard because I had yet to sit down with my family and truly enjoy the season. I had been so preoccupied with gifts, vacations, being exhausted and angry, that I forget to pay attention to what REALLY matters: my family and my traditions with them. My son must have realized that I was upset about it, and he came over and hugged me. "Its OK mommy, you don't have to be sad" he said. Wow. My 6 year old knows that I am so disappointed in myself; but, he also brought me right back to where I should be. Right with him.
So, if my presents don't get wrapped, or we forget something for vacation, or I couldn't get out to get a gift, what does it matter? As long as I have my little man and my hubby with me, the world could collapse around me! Remember, if you are in the same boat as I am, STEP BACK, reassess your traditions, and ENJOY THE SEASON WITH YOUR FAMILY!!!
With that said, I will check back in the next few days, but I may not have any new projects. I will be starting fresh January 1st!
Until next time, hope to find you SPENDING TIME WITH YOUR FAMILY :) Next year I'll catch you craftin' and stampin'!
Tuesday, December 20, 2011
Check out this AWESOME giveaway that I found over at Crafting From the Heart! !
You all SERIOUSLY need to hop over to Crafting from the Heart today! I found a super great giveaway that she is hosting for her end of year! She is giving away:
- a $150.00 gift card to Michael's
-Copic Coloring Air Brush Systems
- Copic Swatch Book
-Copic CIAO Marker Set
HOLY COW!!! Enter to win guys!!!! Would love to see one of my blog followers win this!!!
Til tomorrow! Hope to catch you all craftin' and stampin'!
- a $150.00 gift card to Michael's
-Copic Coloring Air Brush Systems
- Copic Swatch Book
-Copic CIAO Marker Set
HOLY COW!!! Enter to win guys!!!! Would love to see one of my blog followers win this!!!
Til tomorrow! Hope to catch you all craftin' and stampin'!
Monday, December 19, 2011
Paper Crafters Library Design Team Submission
Hi Blog Friends!
Today you will get a special treat! I am submitting a few designs for the Paper Crafters Library Design Team!!!! So, hope you all enjoy!
Here are my 3 best designs for my submission for the Paper Crafters Library Design Team!!
I am very nervous about doing this, but I will be SO upset with myself if I don't! I will always wonder "what if I would have done it" and I know I would never let myself live it down. I'm JUMPING out of my "comfort zone"!
So, here goes nothing!!!
My 3entries are going to ALL be holiday items! I hope that is OK!
The first 2 pictures are actually items that I made from your tutorial about manila file folder organizers. I LOVED making these! Here is 2 pictures for you to see!


The next card was also one of the ones I created for my holiday cards. It was fun experimenting with new items. I have never used letterpress plates before this project. I used a letterpress plate from Stampin' Up. I used both Versamark ink, and I also made one with white craft ink. Both turned out fantastic, but this one was my favorite out of both methods!

The next I item I made was created with my die cutting machine (Cricut Imagine). I am showing off this project because it is the first time anything I ever created got mentioned online! This was mentioned in the Cricut Chirp (first week of December 2011)! I was very excited about it!!! So, here is my wall/door hanging.
 (Sorry, this picture was taken from very far away! I had to zoom in! Also, it should be noted that I purchased a new camera for still shots that I will be using for any pictures I need to take if I should be picked to be on your design team!)
Here is a link for my You Tube Video. It is a short video on how to use the new framelet's dies that are coming out in January from Stampin' Up. Please note that I asked for a tripod that my husband will give me on Christmas morning, lol. And I am also experimenting with my lighting. I hope it is bright enough for you to see!
Thank you so much for the opportunity to try out! Even if I do not make it, I had a great time trying! And, there is always next year ;)
Til next time....I hope to find you all craftin' and stampin'
Today you will get a special treat! I am submitting a few designs for the Paper Crafters Library Design Team!!!! So, hope you all enjoy!
Here are my 3 best designs for my submission for the Paper Crafters Library Design Team!!
I am very nervous about doing this, but I will be SO upset with myself if I don't! I will always wonder "what if I would have done it" and I know I would never let myself live it down. I'm JUMPING out of my "comfort zone"!
So, here goes nothing!!!
My 3entries are going to ALL be holiday items! I hope that is OK!
The first 2 pictures are actually items that I made from your tutorial about manila file folder organizers. I LOVED making these! Here is 2 pictures for you to see!
Outside of organizer
Inside of organizer
The next card was also one of the ones I created for my holiday cards. It was fun experimenting with new items. I have never used letterpress plates before this project. I used a letterpress plate from Stampin' Up. I used both Versamark ink, and I also made one with white craft ink. Both turned out fantastic, but this one was my favorite out of both methods!

The next I item I made was created with my die cutting machine (Cricut Imagine). I am showing off this project because it is the first time anything I ever created got mentioned online! This was mentioned in the Cricut Chirp (first week of December 2011)! I was very excited about it!!! So, here is my wall/door hanging.

Here is a link for my You Tube Video. It is a short video on how to use the new framelet's dies that are coming out in January from Stampin' Up. Please note that I asked for a tripod that my husband will give me on Christmas morning, lol. And I am also experimenting with my lighting. I hope it is bright enough for you to see!
Thank you so much for the opportunity to try out! Even if I do not make it, I had a great time trying! And, there is always next year ;)
Til next time....I hope to find you all craftin' and stampin'
Using Stampin Up's New Framelet's Dies! and UPDATE TO BLOG CANDY GIVE AWAY!!!
Hi Hi Hi!!!
I am SO proud of myself for learning how to add videos to my You Tube Channel and now to my blog! YEAAAAA! So, since I am ALL about making some videos, I made a quick one about using these AWESOME new dies that will work with your Big Shot, or any other die cutting machine for that matter!
These new dies will be available starting January 1st and they are in the upcoming Occasions Mini Catalog. They are called Framelet's. They "nest" inside one anther so you can enlarge and decrease the size of the item you want to die cut. The ones that I am using in my video are the Label's Collection.
(While watching my video, you should know that I asked HUBBY SANTA for a tripod for Christmas, lol)
There are other dies that are in the catalog, but these were the ones I wanted now!
Also, please don't forget to check out my Stampin' Up site! They still have A LOT of items that are going for 80% off!! Check out my post from last Thursday where I show you which punches I ordered!!! I know for a FACT that I ordered dups...I was rushing and wanted to be sure I got them at the discounted price! So, my loss is your gain! Keep checking back each day on my blog, cause I will be doing another blog giveaway!
And speaking of blog giveaway, HELLLLOOOO! I have an open blog contest! No one has entered it yet!!! I want to give things away!!! If by tomorrow I do not have anyone that entered a project into Mr. Linky, I will give the blog candy away to the first person that gets me 1 new follower! All that will have to be done is this:
1. YOU MUST BE A FOLLOWER
2. YOU MUST INVITE A FRIEND TO BECOME A FOLLOWER ON MY BLOG
3. HAVE YOUR FRIEND MAKE MENTION THAT THEY ARE A NEW FOLLOWER AND THAT YOU SENT THEM TO MY BLOG
That's all!!! I really want to give something away before I leave for vaca!!! Which, by the way, does not need to hurry any faster to get here! I'm already WAYYYYY behind on everything!
OK friends, that's all for me tonight!
Hope to find you all Craftin' and Stampin'
Sunday, December 18, 2011
Stampin Up Quick Haul Video! And dont forget about blog candy!!!
Hey All!
I am in the middle of trying to get ALL of my last minute stuff done! Not only Christmas Shopping, but my son has his little classroom party and I am making a bunch of goodies for them! I also have a lot of packing to do for our upcoming Cruise! Today is my only day off before everything goes down, so I gotta hustle!!
So, hopefully you can all see this quick video I made of my most recent Stampin' Up Haul...still waiting for my punch haul to arrive!!!
Please don't forget that I have Blog Candy to give away!!! I may be adding the punch that I ordered by mistake from the video to my next blog giveaway!
Hope to find you all Craftin' and Stampin'!
XOXOX
Jessica
Thursday, December 15, 2011
2 BIG ANNOUNCEMENTS!!! Baby and a SALE!!!!
Good Evening all!!!
I have 2 big announcements!!!
1. I want to say CONGRATS to my partner Cristy and her husband Gus and welcome beautiful and HEALTHY baby Clara! She arrived at 7:00 P.M. after 7 looooonnnngg hours of pushing! She was 7lbs 11oz and 21 inches long! She looks JUST LIKE HER MOMMY! Both new mommy and baby are doing fantastic!!!
2. Please check out my Stampin' Up site! Stampin' Up is having a HUGE sale!!! They have items discounted up to 80% off! I just stocked up on the punches that I have been after since I started with Stampin' Up!!! Just to name a few that I grabbed:
 Wide Oval

 Scallop Oval
 Scallop Square
 Modern Label
 Snowflake
 Large Oval
This sale is going on from now while supplies last!!! Don't wait too long!!!
Also, please do not forget that I have a contest going on! I really hope some people enter! I have blog candy up for grabs!!!
I have 2 big announcements!!!
1. I want to say CONGRATS to my partner Cristy and her husband Gus and welcome beautiful and HEALTHY baby Clara! She arrived at 7:00 P.M. after 7 looooonnnngg hours of pushing! She was 7lbs 11oz and 21 inches long! She looks JUST LIKE HER MOMMY! Both new mommy and baby are doing fantastic!!!
2. Please check out my Stampin' Up site! Stampin' Up is having a HUGE sale!!! They have items discounted up to 80% off! I just stocked up on the punches that I have been after since I started with Stampin' Up!!! Just to name a few that I grabbed:
Wide Oval Scallop Circle
Scallop OvalScallop SquareModern LabelSnowflakeLarge OvalThis sale is going on from now while supplies last!!! Don't wait too long!!!
Also, please do not forget that I have a contest going on! I really hope some people enter! I have blog candy up for grabs!!!
Wednesday, December 14, 2011
Cut file for NOEL Banner that I posted about on 12/2/2011 & CONTEST with BLOG CANDY!!!
Hi All!
I am REALLY trying to figure out new things that I can do on my Blog...Like, for example, I am going through all my saved cut files that I stored on my Gypsy and my CCR, and I saw the Cut file that I made for my NOEL wall hanging. I am thinking, "gosh, that would be nice to share"...but HOW TO SHARE is the question...So, lets see if I put up a link for my NOEL Banner what you all think of it! If you open it, and there is a problem, please let me know!
Now, the other thing I wanted to learn how to do on my blog, was how to host a contest that will actually WORK...lol! I haven't been having much luck so far, lol! Then, I had the brilliant idea to look at a MR LINKY account. And I sure did!
After all that is said, how about a fun CONTEST????
I will keep the contest open for 1 week, and I want to see what you create with my NOEL cut file. I took the color out of the ornaments, so all you have to do is put your own colors in, and I want to see how YOU put together your banner. I'm thinking some blog candy is in order, don't you???? How about 2 holiday stamps and some creative memories border paper???

Here's what you have to do to enter:
1. Be a follower
2. Upload your picture to Mr. Linky
3. Refer my page to a friend, and ask them to stop by my blog!
4. HAVE FUN!
Hope to find you all craftin and stampin!
I am REALLY trying to figure out new things that I can do on my Blog...Like, for example, I am going through all my saved cut files that I stored on my Gypsy and my CCR, and I saw the Cut file that I made for my NOEL wall hanging. I am thinking, "gosh, that would be nice to share"...but HOW TO SHARE is the question...So, lets see if I put up a link for my NOEL Banner what you all think of it! If you open it, and there is a problem, please let me know!
Now, the other thing I wanted to learn how to do on my blog, was how to host a contest that will actually WORK...lol! I haven't been having much luck so far, lol! Then, I had the brilliant idea to look at a MR LINKY account. And I sure did!
After all that is said, how about a fun CONTEST????
I will keep the contest open for 1 week, and I want to see what you create with my NOEL cut file. I took the color out of the ornaments, so all you have to do is put your own colors in, and I want to see how YOU put together your banner. I'm thinking some blog candy is in order, don't you???? How about 2 holiday stamps and some creative memories border paper???
Here's what you have to do to enter:
1. Be a follower
2. Upload your picture to Mr. Linky
3. Refer my page to a friend, and ask them to stop by my blog!
4. HAVE FUN!
Hope to find you all craftin and stampin!
Tuesday, December 13, 2011
And my cards are OFFICIALLY DONE!!!
I want to first thank one of the blogs that I follow for the inspiration for one of my last cards. "Prairie Paper and Ink" is who I owe a big THANK YOU too! I was looking for a card that didn't exactly say CHRISTMAS since we have some friends who may not believe too much in the true meaning of Christmas. I still wanted to send them card though! Here is what it looks like:
 Doesn't exactly scream Christmas AT ALL to me! But I still was able to express that we wanted them to have a happy holiday!
Here is the next card that I made to finish off my Christmas Cards! This was my own idea, and it was BEYOND easy...once again, there is no tutorial on this card; I'm pretty sure just by looking at it, you can figure it out! lol! I can tell you all the stamps, ink, and embossing powder are Stampin' Up!

Now that they are ALLLLLL done, its time to get signing and addressing! My next project is to make all the games and fun stuff for my sons Christmas Party at school! My goodie box from Stampin' Up will be arriving on Wednesday, and I can get started on his stuff! I already have the Cricut Imagine Cartridge, Santa's Village that I will be printing out coloring sheets for the kiddos. Then with my stuff coming on Wednesday, I can make the Holiday Bingo game for them all! I also have a SPECIAL ORDER of "Magic Reindeer Food" coming from the Jolly Man himself, and that should be READY by tomorrow ;)
Ok folks, I'll be posting pics of all the stuff all finished for the kiddos, and I will still be posting a video of my Early Christmas Gift! See post from 12/12/2011.
So here's my new sign off....Hope to find you all craftin and stampin!
Here is the next card that I made to finish off my Christmas Cards! This was my own idea, and it was BEYOND easy...once again, there is no tutorial on this card; I'm pretty sure just by looking at it, you can figure it out! lol! I can tell you all the stamps, ink, and embossing powder are Stampin' Up!
Now that they are ALLLLLL done, its time to get signing and addressing! My next project is to make all the games and fun stuff for my sons Christmas Party at school! My goodie box from Stampin' Up will be arriving on Wednesday, and I can get started on his stuff! I already have the Cricut Imagine Cartridge, Santa's Village that I will be printing out coloring sheets for the kiddos. Then with my stuff coming on Wednesday, I can make the Holiday Bingo game for them all! I also have a SPECIAL ORDER of "Magic Reindeer Food" coming from the Jolly Man himself, and that should be READY by tomorrow ;)
Ok folks, I'll be posting pics of all the stuff all finished for the kiddos, and I will still be posting a video of my Early Christmas Gift! See post from 12/12/2011.
So here's my new sign off....Hope to find you all craftin and stampin!
Monday, December 12, 2011
Ohhhhh, Santa came EARLY this year :)
Yahoooooooo!!! My EARLY Christmas Present FINALLY came this past Friday! I really wanted to post about it Friday, but I had my work Holiday Party, as well as my partners last day of work before she delivers her newborn angel next Thursday! And then I REALLY wanted to play with it and post about it on Saturday night, but forgot we had dinner reservations with hubby's friends from work! I REALLY wanted to play with it then, but was WAY to tired to play with it when we got home! Then, as you all saw yesterday, we had Cookie Day with my family on Sunday, so I STILL didn't get to play with it! BUT, what exactly is "IT" you ask?? I think a picture with speak a 1000 words!!!!

Yup, you see it???? Its a SILHOUETTE CAMEO!!!! I have been waiting FOREVER for it!!!! I decided I would put it on Layaway from Oh My Crafts and it was 3 payments of $90....what a DEAL! I knew I didn't have the money for it all up front, by I knew I could do 3 monthly payments for it!!! I just wish that I could have some time to play with it already!!! At least I downloaded the Sure Cuts A Lot 3 onto my computer, so I will be ready! I have been checking out some of the cuts that I can purchase for roughly $6.99 a set (GREAT PRICE) and I think my first download is going to be the 3D Letters file! I cant wait to do it!!!!
I am going to tape myself opening the box (hence why I put a regular picture up, and not one of mine pics, lol!) and put it on You Tube at some point this week! It's gonna be SOOOO MUCH FUN to play with!!!
Til tomorrow!!
Sunday, December 11, 2011
Cookie Day!!!
Today was such a great day with my family! It was Christmas Cookie day! We made Sugar Cookies, Pizzels, Peanut Butter Kiss, and Sugar Cookies!


 I brought my Cricut Cake Machine with me and we made some fondant cut outs for the sugar cookies! My brother, sister in law, and parents have never seen a Cricut machine in action... Can you believe it?? They thought it was so very cool!!! I LOVED introducing them to it! Next step is card making for the girls and glass etching with Cricut for the boys! Anyway, back to the cookie talk!
This was the first year we made the Santa Surprise Cookies and I'm SO glad we added them to our yearly tradition! They are awesome and super easy to make! But, I bet you are wondering what the surprise is! Well...... It's a SNICKERS MINI in the middle of the cookie!!! Yuuuuummmmmyyyyy! Here's some quick pics of how I made them, and of coarse, the recipe!


Also, here is a quick pic of what the Cricut Fondant Cutouts looked like!!!

And last, but not least, a quick picture of what my angel looked like after we were FINALLY all done making cookies!!! Until tomorrow!!!

This was the first year we made the Santa Surprise Cookies and I'm SO glad we added them to our yearly tradition! They are awesome and super easy to make! But, I bet you are wondering what the surprise is! Well...... It's a SNICKERS MINI in the middle of the cookie!!! Yuuuuummmmmyyyyy! Here's some quick pics of how I made them, and of coarse, the recipe!
- 1 cup butter , softened
- 1 cup creamy peanut butter
- 1 cup brown sugar
- 1 cup white sugar
- 2 eggs
- 1 teaspoon vanilla extract
- 3 1/2 cups all-purpose flour
- 1 teaspoon baking soda
- 1/2 teaspoon salt
- 24 Snickers miniature candy bars
Directions:
- Preheat oven to 300°F.
- In a medium bowl, sift together flour, baking soda, and salt.
- In a large bowl, mix together butter, peanut butter, and sugars until light and fluffy.
- Add eggs and vanilla and combine thoroughly.
- Then mix in flour mixture.
- Cover and chill dough 2-3 hours.
- To form cookie, scoop a tablespoon of chilled dough and flatten.
- Place a miniature Snickers in the center and form the dough into a ball around the Snickers.
- Place on a greased cookie sheet.
- Bake for 10-20 minutes.
- Cool cookies on a rack.
- Optional: Decorate cookies with powdered sugar or drizzled melted chocolate or both.
Dough after its chilled for 2-3 hours
Flattening out a tablespoon of dough
Cutting up my Snickers Fun Size to be the size of Snickers Minis, lol!
Placing my Snickers in the center of my dough
Wrapping the dough around the Snickers
ALL DONE :) And boy are they are surprise for your taste buds!
Also, here is a quick pic of what the Cricut Fondant Cutouts looked like!!!
And last, but not least, a quick picture of what my angel looked like after we were FINALLY all done making cookies!!! Until tomorrow!!!
Wednesday, December 7, 2011
Have you checked out the NEW Cricut Craft Room Exclusives????
So, have you had a chance to look at the new Cricut Craft Room Exclusives? I have been going GAGA over the new digital cartridges!!! I downloaded 6 of them already!!! Here are the ones I got:


Gnomes and Mushrooms
Funny Faces
3D Hats
3D Pinwheels
3D Bows

Page Pals
Thanksgiving Table Decor
Seriously, when I tell you, I have over 100 cartridges in my collection and now I have the Craft Room Exclusives. I have NO CLUE when I will EVER have the time to use all of them, but I LOVE knowing that if I ever need them, they are there! My ultimate goal at some point in my near future is to be able to craft for a living. I think that would really make getting up easy, lol! I want to set a goal for the new year....I want to be able to use one cartridge a day to create a project for my blog followers. I have to admit, I am quite pleased with myself for actually keeping up with a post a day. Its turned into my nightly ritual. And it is also my therapy. I love coming home and decided what I'm going to write about for the next day!
Oh, and I experimented with my stamp machine...I'll have to post about it later though ;)
Until next time!
Tuesday, December 6, 2011
Trying out my Teresa Collins Stamp Maker
So, I wont have a project available for you today because I am ATTEMPTING to create a stamp with my Teresa Collins Stamp Maker. I have watched EVERY available video on You Tube and I have even watched the awesome video that Megan Elizabeth (from Above Rubies Studio) created that came with my Stamp Maker.

WHY AM I SO AFRAID TO TRY IT OUT????
I think because I am so scared I will mess it up and get fed up with my machine and throw it out onto Atlantic Ave. Since I paid a pretty penny for the machine, I would rather not do that!
Here is the image I want to attempt a stamp out of:

I also want to try to create a sentiment to go with that picture!
I don't want to fail!!!! AHHHHHH! OK, breathe, breathe, just breathe! I CAN DO THIS! I WILL DO THIS!!!
Wish me luck Blog Friends!!! I'm off to try it now!!!!
I will re post again if it works out correctly!!!
Monday, December 5, 2011
Joyful Season Letterpress Card
So today I am going to be showing you a card that I made with a letterpress die from Stampin' Up called Joyful Season:
 So, I used the above letterpress plate to create this:

This card was SO simple to make! Here is the card recipe:
-1 piece of white card stock, cut at 4 1/4 by 11 and scored at 5 1/2
-1 piece of red card stock cut at 4 1/4 x 5 1/2
-1 piece of coordinating patterned card stock cut at 4 x 5 1/4
-1 piece of coordinating patterned card stock cut at 1 1/2 x 2 1/2
-Joyful Season Letterpress Plate
-Versamark Ink Pad
-Big Shot or other die cutting machine
-3 Stampin Up Glimmer Brads (brights)
-Crop O Dial
-Adhesive
-Baby wipe
Take your versamark ink pad and ink up your letterpress plate. Run your piece of red card stock through your die cutting machine (with the Big Shot, have the platform on Tab 1, letterpress plate, red piece of card stock, acrylic pad, and a piece of paper to act as a shim) to create your die cut. Use your baby wipe to clean off the letterpress plate. After you create it, you will trim it so it becomes 3 X 5 1/4. You will take the larger piece of patterned paper and adhere it to the white card stock. Next, take your small piece of patterned paper and punch out 3 holes that are 3/16 inches apart from each other. Adhere that piece to your red die cut piece and punch out 3 more holes that are lined up with the piece on top. After that, pick out 2 red brads and 1 green brad from Stampin Up Brights Glimmer Brads and push them through both pieces of card stock. to finish the card, adhere that large piece on top of your patterned paper that you already adhered to your card base.
You now have another card in your samples to create for your Christmas cards!
Thanks for sticking with me!!! I'll be back tomorrow with anther holiday project!
Sunday, December 4, 2011
A Quick and Easy Card to show :)
OK, so I didn't take pictures of making this card, only because its pretty simple! Now don't think because its simple that it lacks any fun and beauty! AND, as long as you have a set of Christmas Stamps that have at least 1 icon (because you can even pull it off with repeating the same icon 3 times!!!) you can recreate this card! It was very, very easy!!! Here is what the card looks like:

-1 piece of white card stock that's 4 1/4 by 11
-1 piece of patterned patter that is 4 by 5 1/4 (mine is fromMy Minds Eye "Be Merry" 6 X 6 paper stack)
-1- piece of matching patterned paper that is 1 1/2 X 5 1/4 (My Minds Eye "Be Merry" 6 X 6 paper stack)
-Coordinating Inks (mine of coarse are from Stampin Up-Old Olive, Daffodil Delight, Real Red)
-Embossing power that is matched to your paper (I used Wild Wasabi from Stampin Up)
-Holiday stamps with icons (mine are from a retired set from Stampin Up)
-Square Punch
-Scissors (to finish cutting the rest of the white paper showing on icons)
-White Gel Pen
Not much too it! I really made this card in about 15 minutes!
Ok, thats all for now folks :)
Saturday, December 3, 2011
Crisscross Card-With LOTS of pictures...as promised!!!
Happy Weekend!!!
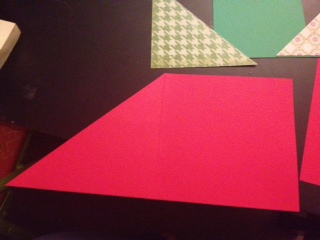
As promised on Tuesday's post, I have taken a SLEW of pictures for today's post! I made a crisscross card. I saw this idea awhile back on Faith Abigail's blog, then I got reminded of it when I read the article on it in my Card Maker's magazine this month! So, here is the start of the card!!!
First you need a piece of any solid color card stock of your choice. It needs to be 5 1/2 by 11 and scored at 5 1/2 Then you cut from the bottom right hand side up to the top of your score line (on a diagonal). Here is what the piece should look like:


Now, here is my finished inside of card!!!
As promised on Tuesday's post, I have taken a SLEW of pictures for today's post! I made a crisscross card. I saw this idea awhile back on Faith Abigail's blog, then I got reminded of it when I read the article on it in my Card Maker's magazine this month! So, here is the start of the card!!!
First you need a piece of any solid color card stock of your choice. It needs to be 5 1/2 by 11 and scored at 5 1/2 Then you cut from the bottom right hand side up to the top of your score line (on a diagonal). Here is what the piece should look like:
Next, you will repeat with another piece of the same color card stock as in step 1, except this time, you will cut from the bottom LEFT hand side corner up to the top of your score line.
Now that you have your two pieces all ready for the "pocket" section of your crisscross card, you can glue the 2 square pieces together.
Now, you need your decorative corner pieces. These are the bottom triangles that we will be cutting up. The easiest way to make them is like so: cut a square of 5 X 5 and cut in half on a diagonal. VERY SIMPLE! You will use 1 solid color as a mat (pieces cut from 5 X 5 square), and 2 patterned pieces to be the pieces shown (cut from 4 3/4 X 4 3/4 square).
After you get your angle pieces done, you will need another patterned paper square cut at 5 1/4 X 5 1/4. You do NOT cut this one is half. Instead, it stays as a square piece. You will use this to mount on the inside of the angles before you seal them on to make the card.
This is what our card will look like before we finish it up. On the 2 red angles, we will be adding our green solid mat and then our patterned piece of paper.
Now, VERY IMPORTANT!!!! You must follow these steps correctly, or you will seal your card in the wrong areas, and you wont be able to fit your piece of card stock with your sentiment stamp. After you mount your top main piece (in the picture, its the green paisley looking piece of patterned paper), you will then attach your green mat, followed by your patterned card stock, ALL ON THE LEFT SIDE FIRST! Then, you will repeat for the right hand side. Next, and this is VERY IMPORTANT, you will run your adhesive along the BOTTOM OF THE CARD ONLY! This is the green paisley paper that I mean to run adhesive on. Then, fold in the LEFT HAND SIDE. Now, put adhesive on the bottom right hand side corner of the right side fold. You should be gluing on the back of the patterned paper (on the red part). You will NOT glue the ENTIRE piece, cause if you do, you will not be able to slid the sentiment card in!!! I hope that was clear!
Now, here is my finished inside of card!!!
So, that's it! I hope this was easy!! I will be taking more and more pics as my posts go on. This was the most I took, and I had to remember it all!
Friday, December 2, 2011
Another Wall/Door Hanging-NOEL
Hello my dear friends!
Since yesterdays post was the one highlighted in the Chirp, I thought I would do another wall/door hanging:

For this decoration, I used the following:
-Cricut Font and Basic Shapes
-Cricut Winter Woodland
-Cricut George and Basic Shapes
-Ribbon of your Choice
-Cricut Imagine
-Cricut Mr. Frosty
-Adhesive
-Hot Glue Gun
I used my George cartridge and flood filled the 4 scalloped squares (which were cut at 4) with Mr. Frosty patterned paper. I then used the red that came with the colors on Mr. Frosty and flood filled 4 squares that were all cut at 3. I cut out the word NOEL from Font and Basic Shapes, which I cut the letters out at 2.5 I moved onto the Winter Woodland Cartridge and cut out 4 ornaments (3 inches) and their layers. I adhered them all together and pieced together my squares. After that, I used my glue gun to glue the ribbon into place!
Easy peazy!!!
These make excellent decorations, as well as gifts for family members!!!
Thursday, December 1, 2011
HO HO HO Holiday Wall Hanging.. And our countdown begins!!!
It's 25 days until Christmas!!! Yahooo!!!
Oh what fun I had making this wall/door hanging!!! It was SUPER easy and fun to make!!!!

Sorry if its a LITTLE out of focus! lol! That's the story of my life sometimes...hee hee! Here's what I did to make this cute little decoration!!!
-Cricut Jolly Holidays Cartridge
-George and Basic Shapes
-Cricut Imagine Machine
-Cricut Mr. Frosty Cartridge
-Fonts and Basic Shapes
-Ribbon of your liking!
-Adhesive
-Glue Gun
I cut out the 5 scalloped squares on my Imagine at 4 inches each, but I first flood filled the scallop with one of the pattern designs on Mr. Frosty cartridge. I then cut out 5 circles from George at 3 inches. I didn't flood fill, instead I just used green card stock. Then, to make the Jolly Guy, I cut him out at 4 inches from Jolly Holidays! I used Cricut Font and Basic Shapes in the craft room to cut out 3 HO HO HO's at 2.5 inches. After I cut and adhered all the layers together, I glued down my circles to my scalloped circles, then I used my glue gun to glue down my ribbon to attach all the circles! Then, viola! Its complete!!! Mine will be hanging from my front door this weekend when I am decorating!!
Wednesday, November 30, 2011
3-D NOEL picture
Hello again bloggies!!!!
Time for another project!! If you follow me on the Cricut Message Boards, you will have already seen this. If not, its BRAND NEW TO YOUR EYES :)

Let me just tell you HOW EASY this was!!! Here is what you need:
-Picture frame (I only get my frames from the dollar store when I know I am going to be making altered art with it)
-1 Sheet of background holiday paper for frame. This paper is from a stack of holiday single sided paper from Michael's
-2 sheets of different colored patterned paper to create your bow
-Glue Gun
-Adhesive
-Cricut Digital Cartridge: 3-D Bows
-Cricut Craft Room
-Any font cartridge, or stick on letters.
You will first start out by choosing your paper for your background of your picture frame. Now depending on what size frame you get, you will cut it according to the size. My frame was an 8 1/2 x 11 size frame, so I cut my background sheet at that size. Next, you will log into your Cricut Craft Room and use your 3-D Bows digital cartridge. Make the bow you would like!!! Once you are done with the bow, you need to cut out your letters. You can use ANY font you would like. Heck, you can even use stick on letters that you may have in your stash! If you choose to create your letters, you can cut them out on your cricut, then you can use regular adhesive and adhere it to the GLASS on the frame. After that, heat up your trusty hot glue gun, and glue your bow onto the glass. DON'T TRY TO USE ADHESIVE! IT WILL FALL OFF! Be careful with your glue gun! Don't burn yourself! :)
Now, hang it up, and show it off to all your friends and family!!!
Til next time!!!
Tuesday, November 29, 2011
AHHHHHHHHH!!!! Sooooooo excited!!!!!!! Mentioned in CRICUT CHIRP!!!
Oh my GOSH!!!! I just was looking at the Cricut Chirp, and I was MENTIONED!!!!!! AHHHHHH!!!
The funny thing is, I have been working on my posts for the next few days, and the post that is scheduled for Friday is the picture they highlighted!!!!!!! I am BEYOND excited!!! I cant even tell you!!!! My picture is the Ho Ho Ho Wall/Door Hanging!!!
God, I have been trying for MONTHS to get something recognized on the Chirp...holy cow, what an honor!!! Just SOOOO excited!!!! THANK YOU CRICUT CHIRP FOR MAKING MY DAY!!!!!!
Oh, and just so we are all clear, this is 3 POSTS in 1 DAY!!! LOL ;)
OK blog friends, thanks for checking in!!! Until tomorrow!!!
What?? 2 posts in one day??? Nah, acutally a Cricut Mini Follow up from last post!
So, I just got off the phone with Cricut Support. After a VERY long hold time, I got the NICEST and MOST PATIENT girl on the phone. She listened to me rant for about 10 minutes then asked me a few questions. After she asked a few questions and had me test out the things that I already did, she asked if I adjusted the pressure. Did I adjust the pressure???? NOPE! Didn't see where the pressure lever was in the instruction book, and I totally forgot about it!!! After I adjusted the pressure, my little Cricut Mini worked like a CHARM!!! Here is a quick picture of where you can find AND ADJUST the pressure of your mini:

That little lever will help you create your masterpieces on your mini!!! Sure wish I would have done that BEFORE I wasted a whole pack of paper!! lol! BUT, I must say, the reason why I LOVE Cricut is because of this: After my rant, and after we got my machine fixed, the kind girl tells me that because of my troubles, she is going to credit my Cricut account $20 for all my problems! How awesome is that??????
That little lever will help you create your masterpieces on your mini!!! Sure wish I would have done that BEFORE I wasted a whole pack of paper!! lol! BUT, I must say, the reason why I LOVE Cricut is because of this: After my rant, and after we got my machine fixed, the kind girl tells me that because of my troubles, she is going to credit my Cricut account $20 for all my problems! How awesome is that??????
Subscribe to:
Posts (Atom)