






Google Adsense

.
Showing posts with label Big Shot. Show all posts

Monday, May 20, 2013

Bridal Shower Card

Click HERE for my 500 Follower Giveaway! Make a comment on that post & follow my blog for your chance to win!!!

Hey All!
 
So, my BFF's Bridal Shower has FINALLY happened! It has been a LONG time coming, but its finally over! She had such a great time! Even though she hates being the center of attention, she still enjoyed it all! We had it at a little Italian Restaurant near us, and it was great! She even surprised us! She did know, but that was still OK!
 
Here is the beautiful bride to be!


We had it set up very lovely! It was a nice intimate occasion!
 
Here is the card I made her. Now, this is NOT an original design. I remember seeing this card made a ways back (I think it was on Stampin' Connection), and I cant remember who I saw create this! BUT, if you know, please comment below so I can give proper credit! 

 
These are her colors. Its like a Marine Blue and a Lime Green. They look REALLY pretty together! This card took about 15 minutes to make. VERY EASY! Here are the supplies I used:
 
Big Shot
Cricut Pinking Stitch Embossing Folder
Stampin' Up Square Lattice Embossing Folder
Stampin' Up Large Heart Punch
Stampin' Up Everyday Enchantment Ribbon-Lucky Limeade
Recollections Paper
Pearls from my stash
Sentiment from Jaded Blossom Set (I believe it is now retired)
 
She really liked this card. I wrote a little something in there for her! I cried as I wrote it. I am such a such a sap! LOL!
 
OK all, Hope to catch you Craftin' and Stampin'! 

Monday, December 3, 2012

Made Especially For You-Christmas Card with a Die Cut

 Click HERE for my Web Store!!!
 Hey All!!

It's time for another post for Made Especially For You!!

Here are the details for this challenge!!

Week of December 3rd - December 9th
Challenge: Create a Christmas card using a die cut
Sponsor: Whimsical Designs - http://www.whimsical-designs.com/
Prize: 1 stamp set of the winner's choice
Sponsor Button:


For my project today, I pulled out my Big Shot, ONCE MORE, this holiday season. And yes, I know this holiday season JUST BEGUN, but for crafters, you know you work on Holiday items in June! You have to stay on top of things for craft shows, gifts, last minute items, etc, so you HAVE GOT TO BE AHEAD OF THE GAME! So, yes, I say again, I pull out my Big Shot once more! LOL!!

For my project today, I made ANOTHER Gift Card Holder! I know I made once last weekend to show you, but I am showing you another one that I made! I am up to 14 all together now that I made! WHOOP WHOOP!!!

Here is my project:

 
SUPPLIES:
Die Cutting Machine: Big Shot
Die: Stampin' Up Top Note die
Paper: Recollections and My Minds Eye (old stashed piece!)
Die Cut Images: K&Co
Tools: Pop Dots, Crop O Dial, Eyelets, Twine, ATG
 
Tell me this one isn't SUPER CUTE??? I just love the way it turned out!! Heck, I may just keep my Big Shot out for a little while longer!!
 
Make sure you check out the rest of my DT sisters and that you enter your project for a chance to win some goodies!!!
 
OK all, hope to find you all Craftin' and Stampin'! 

Saturday, November 24, 2012

Hiding In My Craft Room-MIX IT UP (with a Christmas Theme)!

Click HERE to shop with me, 24 hours a day!!!
 
 
Hey All!!!
 
WOW....Can I just say that I am E-HAUST-ED after Thursday and Friday??? My body feels like I have aged like 10 years from lack of sleep and being so tried! I need a break! However, it wont be today! I have another craft show (fingers crossed for a good one) and then I am having my friends and family over for our annual Santa Fire Engine Parade! 7 neighboring towns, along with ours, "dress up" their fire engines and get them all decked out and they drive through my town, and finish the big guy himself! The exciting part this year is that it goes RIGHT IN FRONT OF  MY HOUSE! We can just all sit on the porch and watch it go by! It will be SOOO nice!! Speaking of Christmas, we have a challenge!!!
 
Over at HIMCR, our challenge this week is to MIX IT UP-with a Christmas Theme!
 
For me, Mixing it up, would be using something I don't typically use or do with my card making.
 
I made a gift card for you all to see! Wanna see it???
 

From looking at this, can you tell what I mixed up??? Not sure? Well, I'll tell you! I didn't use a SINGLE ELECTRONIC CUTTING MACHINE ITEM on my card!!! What?????? NO???? I really didn't!!!

Supplies:
 
Cutting Machine- BIG SHOT: Stampin' Up
Die- Top Note Die: Stampin' Up
Die cut: K&Co Spotted Canary Die Cut Pack
Paper: Michael's Sugarplums 6X6 paper pad
Adhesive- Pop Dots and ATG
TOOLS: Eyelets: AC Moore, Twine: AC Moore
 
Can I just say how EASY it was to make this card? And I used things I don't typically use! I love my ELECTRIC die cutting machines, so it was nice to give them a break for today!!!
 
 
So, now I would LOVE for you to all check out my DT sisters pages! They all did some AWESOME projects as well! Your gonna love them!!!
 
Then, go on back and link up your MIX IT UP project at Hiding In My Craft Room!!
 
OK all! Hope to catch you all Craftin' and Stampin'! 


Monday, September 24, 2012

Exploring Cricut-Trains, Planes, and Automobiles!

Click HERE for my Made Especially For You post!!!!


Hey All!!

It's time for another awesome challenge over at Exploring Cricut!!!


Here are the details for this weeks challenge:


Monday Sept.24 Challenge-
"Trains, planes, and automobiles" created a card, layout, or papercraft with a cricut cutout of some means of transportation."
 
I have to admit this challenge had me thinking!!! I new I had a ton of cartridges, BUT did I have any stamps with a saying that could work for this weeks challenge???? So, I went digging through ALL my stamps, and found a cute little sentiment. Once I found the sentiment, I knew which form of transportation I was going to create!!!
 
Here is my card:
 
 
Not sure if you can make out what my sentiment says, but it says "LET YOUR DREAM SET SAIL"...I thought the Sailboat from LIFE'S A BEACH was the PERFECT cut for that saying...Don't you??? I used my Big Shot to emboss the waves, and I was going to make foam on the tip of the waves, but I couldnt find my puffy foam!!! WAHHH!! Oh well, when I find it, I will add it!!!

Now, go and check out the rest of the AMAZING design teams projects!! Then enter YOUR project for this weeks challenge HERE!!!

OK all, hope to catch you Craftin' and Stampin'!


Thursday, September 20, 2012

Theme Day Thursday-Shoes!


Hey All!!


Welcome to another Theme Day Thursday post for My Cricut Craft Room!

Today's theme is SHOES!!!

What woman does NOT love a super cute pair of shoes??? I know I ADORE a nice pair of heels that make me look about 4 inches taller! LOL!

So, for my project, I dug out all of my cartridges and I found what I felt was the PERFECT cartridge to show off a classic pair of heels....FOREVER YOUNG.

The cut was a pretty simple one. I cut 4 times, and got a SUPER cute pair of shoes!!! Wanna see???


SUPPLIES:
 
Forever Young Cartridge
Cricut Expression
Pink, Red, Green card stock-Recollections
Patterned Paper-DCWV
Pop Dots
Big Shot
Swirls Embossing Folder
Red& Gold sticky gems-Tuesday Morning
Ticket Corner Punch-Stampin' Up
My Creative Time-Teeny Tiny Tags stamp
Melon Mambo Ink-Stampin' Up
 

I really think these shoes turned out REALLY cute!
 
 
Please make sure you check out the rest of the DT to see what awesome ideas they came up with!!
 
 
OK all, gotta jet...Hope to catch you all Craftin' and Stampin'! 

Monday, December 5, 2011

Joyful Season Letterpress Card

So today I am going to be showing you a card that I made with a letterpress die from Stampin' Up called Joyful Season:

So, I used the above letterpress plate to create this:


This card was SO simple to make! Here is the card recipe:

-1 piece of white card stock, cut at 4 1/4 by 11 and scored at 5 1/2
-1 piece of red card stock cut at 4 1/4 x 5 1/2
-1 piece of coordinating patterned card stock cut at 4 x 5 1/4
-1 piece of coordinating patterned card stock cut at 1 1/2 x 2 1/2
-Joyful Season Letterpress Plate
-Versamark Ink Pad
-Big Shot or other die cutting machine
-3 Stampin Up Glimmer Brads (brights)
-Crop O Dial
-Adhesive
-Baby wipe

Take your versamark ink pad and ink up your letterpress plate. Run your piece of red card stock through your die cutting machine (with the Big Shot, have the platform on Tab 1, letterpress plate, red piece of card stock, acrylic pad, and a piece of paper to act as a shim) to create your die cut. Use your baby wipe to clean off the letterpress plate. After you create it, you will trim it so it becomes 3 X 5 1/4. You will take the larger piece of patterned paper and adhere it to the white card stock.  Next, take your small piece of patterned paper and punch out 3 holes that are 3/16 inches apart from each other. Adhere that piece to your red die cut piece and punch out 3 more holes that are lined up with the piece on top. After that,  pick out 2 red brads and 1 green brad from Stampin Up Brights Glimmer Brads and push them through both pieces of card stock. to finish the card, adhere that large piece on top of your patterned paper that you already adhered to your card base.

You now have another card in your samples to create for your Christmas cards!

Thanks for sticking with me!!! I'll be back tomorrow with anther holiday project!

Thursday, September 8, 2011

Happy Halloween Wreath!

So, working on some Halloween stuff right now! I wanted to make one of these wreaths ever since I saw my first one on You Tube (cant remember who on You Tube for the life of me though...it was a few months back!)! Well, I was in AC Moore about 2 weeks ago and saw that Tim Holt made an extended die for my Big Shot that made the paper rosette's. You know what I had to do, right? You guessed it! Pulled out my trusted 40% off ANY scrapbook purchase and I got that die for $14.99! Yeeeaaa!!! So, I also used a pack of patterned paper that I got from Joanne's that has Halloween, Thanksgiving, AND Christmas paper in it. As a matter of fact, its the same paper I made my Mini Album out of! So, why wait? Wanna see it???
Hope you all like it!!! Have a good day :)

Monday, May 23, 2011

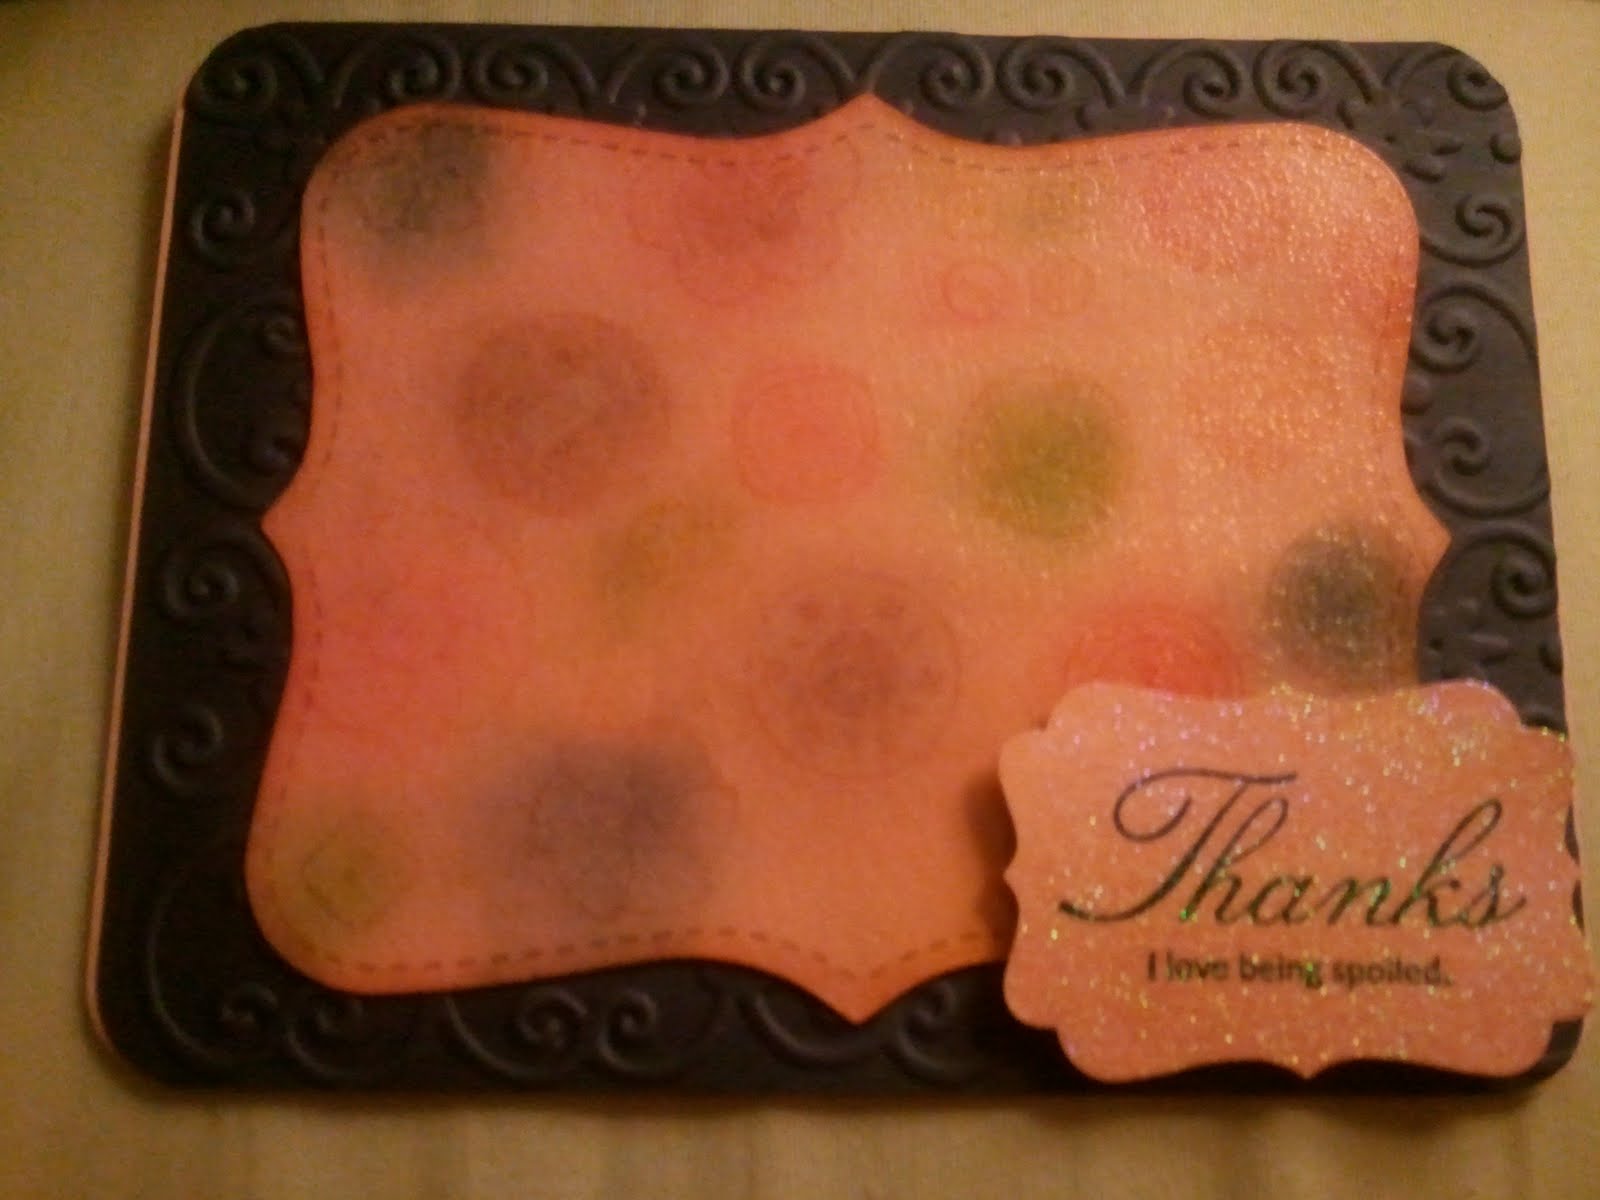
Another Thank You card


I have to say, this is by FAR one of the most fun cards I have made! I felt very "free" when making this card! I used:

Stampin' Up Button, Button Clear Mount Stamps (Used EVERY ONE on a very large clear block)
Stampin' Up Bigz Top Note Die
Stampin' Up Decorative Label Punch
Stampin' Up Afterthoughts Stamp-Thanks I love being spoiled
Stampin' Up Blushing Bride card stock (for die cut)
Stampin' Up Blushing Bride card stock for card base 5 X 4 1/2
Stampin' Up Concord Crush card stock (for layer) cut at 4 1/2 X 4
Sizzix Damask folder
Stampin' Up Stampin' Pastels (for coloring in the button stamps)
Stampin' Up Blushing Bride Stamp Pad
Stampin' Up Concord Crush Stamp Pad
Sponge
Stampin' Up Stampin' Dimensionals
Stampin' Up Snail Adhesive
Versa Mark Ink Pad
Clear Embossing Powder
Transparent Embossing Powder
Heat Tool
Powder tray

I made a top note from Blushing Bride from the Top Note Die on my Big Kick. While with the Big Kick, I placed my piece of Concord Crush in between the Damask folder and pressed it then I set it aside. I placed every button stamp from the Button, Button clear mount stamp set on a large clear block and just stamped the entire top note, and made sure I did not overlap them. I then took my sponge and sponged in Blushing Bride ink the edge of the entire top note. With the Stampin' Pastels, I took a few pieces of cotton balls and dabbed it in a few colors (you can be creative here, choose which ones you like). The best part of this was YOU CAN GO OUTSIDE THE LINES! YEA!! Afterward, take you Versamark Ink Pad and ink the ENTIRE top note cut out. Then, over your powder tray, take the clear embossing powder and cover the entire die. Take your heat tool and heat until the powder melts.

Taking another piece of Blushing Bride, stamp "Thanks, I love Being Spoiled" from  the Afterthoughts stamp set onto the paper. Next, take your decorative label punch and punch out your sentiment. Take your Versamark again and stamp the whole punched out shape. Place over the powder tray, and cover the punch with Transparent embossing powder. Take your heat tool until it melts.

Fold card in half and adhere the embossed piece on Concord Crush with your Snail to the card base. Then, after your top note has dried, adhere that piece with Snail in the middle to the Concord Crush piece. Take four Stampin' Dimensionals and put behind your sentiment piece that should also be cool. Place in the bottom right hand corner of your card.

All finished! All items can be purchased from my website:

http://www.jessicarosewilson.stampinup.net/

Happy Stampin'!