


Click HERE for my Stuck On U Sketches Challenge Project!
Click HERE to follow me on Facebook! Giveaway happens when I get to 2500 LIKES!
Click HERE to follow me on Facebook! Giveaway happens when I get to 2500 LIKES!
CLICK HERE to follow me on You Tube!!!! Always a great time!
JOIN MY TEAM-Craftin' and Stampin' Crew! Click HERE!

Hello,
Alicia here from Alicia-Time To Create!
I am very excited to share my completed School Album with you today!
I have made this for my sister.
This was such a fun and easy project that I really enjoyed putting together.
I was amazed at how simple it actually was to do!
I have done Project Life since 2010 so I am not new to Pocket Scrapping. But this is my first Theme Album that I have successfully completed and my first time using the Close to My Heart Picture My Life Scrapbooking Program.
It was not as hard or time consuming as I thought it was going to be.
It flowed easily and smoothly together. And it was fun to do!
Because this process worked so well for me I wanted to record some steps that I can repeat on future Scrapbooking endeavours. Also I thought these five steps might be able to help others who have School Photos that they want to display in an album.
These are My Five steps to Quickly and Easily Scrap School Photos
- Collect all School Photos Together and Sort into Year Groups. Print any photos that aren't already printed so that you have all your photos ready to work with. I find it daunting if I have some photos on my computer in a big mess and it seems like a huge task to sort through them all and find them. Once you have a pile of photos sitting on your desk it is so much easier to plan your album.
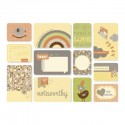
- Buy the Chalk it Up Picture My Life Scrapbook Program from Jessica at Craftin' and Stampin'. This kit really worked for me. At one point during my creative process I got some other cards out (that weren't from the kit) and had a play with them and I found it so much harder. Nothing was matching, nothing was school related, it was taking so much longer. I ended up packing away all the other cards and going back to the kit then I experienced success again straight away. This kit just works! All the cards are there for you to use, they are all school-themed, a variety of the Memory Protector pages come in the kit as well. You don't have to stress about which design you need because you have a variety to choose from so you just choose the one that best suits your current photos.
- Set Yourself a Deadline. I had to blog about my album every Friday. So I had a deadline. I also wanted to complete the project. I made this project a priority in my life.
- Slip Photos and Journalling Cards in. I worked away and slipped photos into pockets and wrote on the cards. A month was a good space of time to work on my album - not too long to lose motivation, not too short for it to feel like a stress.
- Share your Album Progress with Family and Friends! Blogging my progress really worked for me. Sharing with friends and receiving encouragement from others spurred me on! I felt like I was making something meaningful and special. So if you do decide to scrap a school album share your progress with me! I would love to see it!!! And share your album with everyone else too!!
Here is a short video of the completed Album I will give my sister. I do have some inserts in the album with their class photos, but I have not put those on the internet in order to protect the children's privacy.
Also today I wanted to share two Layouts I made at the end of the book. These are an example of how you can do a very simple 12x12 Layout with only the products in the kit. Nothing else was used except white 12x12 card, scissors, glue and a balck pen
For the last year in this album I only had one photo for the whole year for each child so I decided to do a full 12x12 LO.
For the last year in this album I only had one photo for the whole year for each child so I decided to do a full 12x12 LO.
- Layer the photo onto two 3x4 cards.
- Cut the 3x4 card into diagonal strips and paste down.
- Cut banners from a 4x6 card and journal over the top.
- Cut the stars from a 3x4 card.
- Outline with black pen.
 |
| Layout #1 |
Layout #2
- I layered the photo onto two 3x4 cards.
- Then I cut a 4x6 card as the base and pasted behind the 3x4.
- Then I cut the sentiment and stars out from a 3x4 card.
- Then I added my journalling.
 |
| Layout #2 |
Please drop by Jessica's shop to pick up your supplies.
I cant wait to start my new project with you next week...a Picture My Life Baby Album using this kit!! You could do it with me! Get your kit from Jessica and lets do this together!
 |
| Picture My Life Baby Cakes Scrapbooking Program |
If you have missed the other posts in this series see them here:
Week 1
Week 2
Week 3
Week 4
Thanks for stopping by,
Alicia xxx


SEPTEMBER SPECIALS:
Stamp of the Month-Family Is Forever

*Take this stamp home for only $5 when you spend $50 or more!
Click below on the shopping cart to be directed to my online store to grab your goodies!!! And be SURE to click on the AUGUST Mystery Hostess Gathering to enter to win ALL of AUGUST Hostess rewards!!!

September 2014 Constant Campaign: #30yearsofhappy!

National Stamping Month #30yearsofhappy
September is National Stamping Month, and Close To My Heart is ready to celebrate all month long! When you spend $30 on any current retail-priced stamps during the month of September, you qualify to receive the exclusive C-sized stamp set #30yearsofhappy for FREE! This special offer is part of our celebration of National Stamping Month and in honor of our ongoing celebration of our founder and CEO Jeanette Lynton’s 30-year anniversary in the scrapbooking and stamping industry. The exclusive stamp set features 30 mini images and sentiments perfectly suited for 30 days of happy stamping! Plus, make sure you check out Close To My Heart’s Facebook page and Instagram during September to follow all the ways we’re celebrating #30yearsofhappy for a full 30 days!
Dates: Offer valid September 1, 2014–September 30, 2014


0 comments:
Post a Comment